There are three ways to edit Quality Assurance data: 1) Using Client Tool add/edit screens; 2) Revising data in the data acquisition and handling system (DAHS) and importing the revised XML file into the Client Tool; and 3) Modifying an existing XML file outside of the Client Tool and importing the file into the Client Tool (not recommended). If you choose to edit your data, you will need to use the ECMPS QA/Cert Reporting Instructions. The check specifications can be accessed by clicking the check code link in the check code/result column of the Evaluation Report, which will open the Check Specifications Viewer.
To add or edit QA/Cert Test data, click the qa and certification data module button in the Menu Panel in the lower left corner of the screen. Click the add/edit qa/cert test data link in the Module Action Panel. Highlight the facility that you want to edit or select a facility in the facility id (orispl) dropdown box at the top of the screen and click the filter button. To clear the filter, click the clear filter button. When you have selected a facility, click the continue button in the lower right corner of the Working Panel to bring up the add/edit qa/cert test data screen.
The grid that appears in the add/edit qa/cert test data screen will be populated with data from the first location in the location dropdown box. Users can switch between facility locations by using this dropdown box, which is found in the top right corner of the screen. The locations are listed alphabetically by group. The group order is active/future stacks/pipes, active/future units, inactive stacks/pipes, and inactive units.
Located at the top of the screen are tabs for the individual QA/Cert test types (e.g., Linearity Tests, RATA Tests, etc.). All available records for that test type will be displayed in the grid in the upper half of the screen, and the details for the highlighted record will be displayed in the lower half of the screen. The number of records viewed can be further refined by using the test results, system/component, and year/quarter filters at the top of the page.
Editing of QA/Cert Test data can be accomplished by selecting the test type tab and the test number row, and editing the fields in the lower half of the screen. If you make any changes to the data, you must click either the save changes or cancel changes button before you navigate away from that part of the screen. If no changes are made, the save changes and cancel changes buttons are disabled.
Add QA/Cert Test data by selecting the test type tab and clicking the add button in the lower right corner of the top grid. If you add any data, you must click either the save changes or cancel changes button before you navigate away from that part of the screen.
Note: Tests must use a unique test number for each test type for each monitoring location.
In preparing for the production use of ECMPS, the previously submitted QA data will be loaded with renumbered test numbers. As sources begin to report data using ECMPS, they must apply the new test number requirement. The test number field has been enlarged to allow up to 18 characters. This change should assist sources in reporting unique numbers for a given location and test type, and also give sources the flexibility to develop their own numbering system for their data management needs.
The filters in the upper right corner of the Add/Edit QA Test Data screen allow a user to filter the tests by Location, Test Result, System or Component ID, and Year and Quarter. Choosing any of these filter options will cause the Client Tool to display only the specified information. If further sorting of tests is desired, a user may click any of the column headers at the top of the data grid, and the test information will be displayed in ascending order, according to the data in that column. Clicking on the column header again will display the tests in descending order.
For example, if a user desires to find a specific test that was performed in January 2009, he should first set the Year/Quarter filter to 2009 QTR 1. He could then click the End Date column header, and the tests would appear in order from the first test of that type performed in Q1 of 2009 to the last test of that type before the end of the quarter.
Performing an evaluation of a given test will clear the specified filter. Re-entering the filter information will again cause the Client Tool to only display the selected tests.
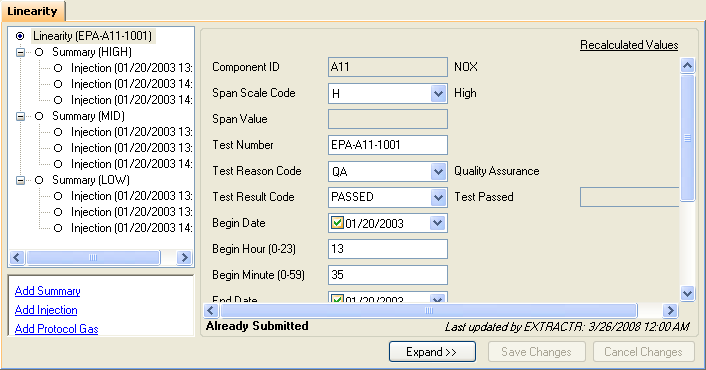
The Linearity, RATA, 7-Day Calibration, Appendix E, LME Unit Default, and Cycle Time tabs are organized using a tree structure. In the lower half of the screen, the tree structure for these test types is located on the left. To expand the tree, click the "+" signs and to collapse the tree click the "-" signs (see image below).

To add a test on a tab with a tree structure, click the add button in the lower right corner of the top grid. This will create and open the Test Summary Data record in the lower half of the screen. Enter values for each of the elements in the Test Summary Data record as indicated in the ECMPS QA/Cert Reporting Instructions. Click the save changes button in the lower right corner of your screen. The Client Tool will perform screen checks of this record and display any errors. To cancel changes, click the cancel changes button in the lower right corner of your screen.
After you have added the Test Summary Data record, begin entering the appropriate children records within the tree structure using the links that appear beneath the Test Summary Data record (links vary by test). Click the save changes button in the lower right corner of the screen. The Client Tool will perform screen checks of this record and display any errors. To cancel changes, click the cancel changes button in the bottom right corner of the screen.
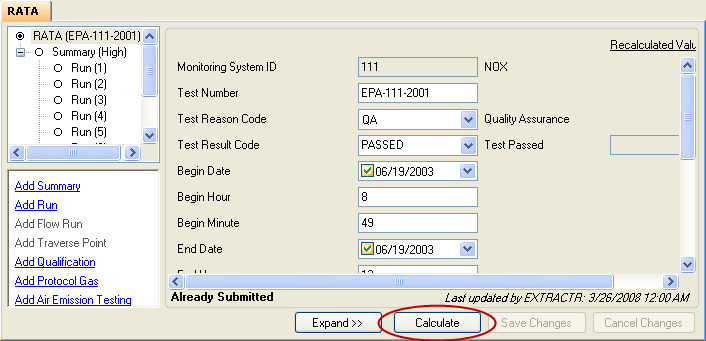
If you enter or import a new QA Test on the add/edit qa/cert test data screen, you can determine the summary values that EPA will calculate using the Calculate functionality. In addition, you may choose to use the calculated values in your QA Test summary record by employing the Move functionality. For example, after entering three injection records for a linearity test, click the Summary level of the tree structure. Then click the calculate button at the bottom of the screen (see image below) and the calculated values will appear in red font. To replace or populate the values in the Summary record with the calculated values, click the move button. This button will appear after the Calculate functionality has been employed, in the location formerly occupied by the calculate button. To save the summary record, click the save changes button.
Note: The Calculate functionality is designed to be used when only raw test data are available. If you attempt to enter some calculated values manually and use the Calculate functionality to generate other calculated values, there is a potential for errors.

The Client Tool ensures that only valid data are stored in the Client Tool database by preventing you from entering invalid data. The following categories of data validation are enforced on the add/edit qa/cert test data screens:
● Valid data type (e.g., date, number, text) and format (e.g., field length, number of decimal places)
● Valid range of values (minimum values for some numeric and date fields and maximum values for some date fields)
● Read-only property prevents modification of key fields in existing records
● Dropdown lists only contain values from a list of valid codes
When you attempt to save a record, the Client Tool performs two stages of error checking. In the first stage, screen checks ensure that all key fields contain appropriate data. If the first stage of checking fails, an add/edit check results window will be displayed and you will be forced to return to the data entry screen. For more information about a screen check, click the check code link in the check column of the add/edit check results window, which will open the Check Specifications Viewer.
If the data passes the first stage of screen checks, the check engine validation process is initiated to further validate the data. Some errors generated by the check engine validation process are designated as "fatal." If the check engine validation generates a "fatal" error, you are not allowed to save the record and you will be forced to return to the data entry screen. If only non-fatal check engine errors are generated, the error messages are displayed and you may choose to save the record.
The check engine validation process includes the following categories of checks:
● Duplicate record checks -- The Client Tool checks for duplicates by comparing test numbers, system/components and end times
● Field-level range checks
● Cross-checks between fields within a record
You may delete any QA/Certification test, QA Certification Event, or Test Extension and Exemption record that has not yet been submitted and loaded into the EPA Host System. A test that has been submitted and loaded into the EPA Host System may be deleted from the Client Tool database if EPA has given you permission to resubmit the test, but the QA Supplemental Data record associated with the test cannot be deleted. An event or extension record that has been reported to EPA cannot be deleted from the Client Tool database. If you want to delete a previously reported test, event, or extension record, you must request permission from EPA to have the item removed from the EPA Host System. If you attempt to delete a previously reported test, event, or extension record without permission from EPA, the Client Tool will generate a fatal error to prevent you from doing so.
If you attempt to delete a test that has dependent records (i.e., Linearity, RATA), you will receive a warning that the dependent records will also be deleted. If the test has already been submitted, you will receive a message that this action will only delete the test from your local Client Tool database, and not from the EPA Host System.
In the grid on the top half of the screen, the evaluation status column is the second column from the right side of the grid. If there is an evaluation error for a particular test, the link in the evaluation status column will reflect the error level. Click the link to view the evaluation results for that particular test. If you edit a test, you can evaluate the test by clicking the evaluate link in the evaluation status column.
After a QA/Cert test has been evaluated, the EPA recalculated values will appear in the column to the right of the data entry fields for the test (see image below). These values are provided for diagnostic purposes. If the values that you entered or imported for a test differ from EPA's recalculated values, then there may be errors in the data that you reported.

Tutorials: To watch various tutorials that briefly explain some of the main aspects of the ECMPS Client Tool, visit the ECMPS Support website.
Feedback: Did this help topic answer your question? Can it be improved? Click here to let us know.